Squeezy Cheek Buddies: A Craft Project
- Seili Abraham

- Feb 8, 2019
- 5 min read
Updated: Nov 19, 2019
How to make adorable, squeezy-cheek buddies. This video and accompanying text steps you through how to make these. This is an easy project that you can involve kids in.
Today we're going to give you a quick rundown on how to make an adorable squeezy cheeks buddy. First you will need one of these awesome sheets of embroidery plastic with the little square holes in them, they're about $0.85 on Amazon (in a package of 12, click here). You will also need a pair of scissors. And for those of us who aren't good at counting you may also need a ruler or a straight edge of some sort with markings to help you know how large the piece is that you're making. Then you're going to want to cut 3 squares per squeezy cheek buddy out of your plastic. I'm going to cheat, I don't have to use the ruler for this one because I’m copying a pre-cut piece. There are 12 squares per squeezie cheek friend. Once you get your first one cut out you can cut a straight line down the embroidery plastic because they will all be the same width.
You should clip off the little nubs so you have a flat edge and there won't be any confusion when you try to cut your next square. Line up the next square and cut off two additional squares so you have a total of three squares.
Pythagoras teaches us that we can't make a triangle out of a square so we're going to cut off 2 of the little corners so there are three open holes on two corners across from each other. Cut through the middle of the holes on a diagonal so you have open holes. This will allow us to get the shape that we want on our squeezy cheek buddy. Complete this operation for all three squares that you’ve cut.
For this project we will use a tapestry needle that has a blunted edge. They aren't sharp so you can do this with children if you want. They have a nice wide opening so they will accept a piece of yarn through the eye. And it's small enough to pass through the holes of your embroidery plastic.


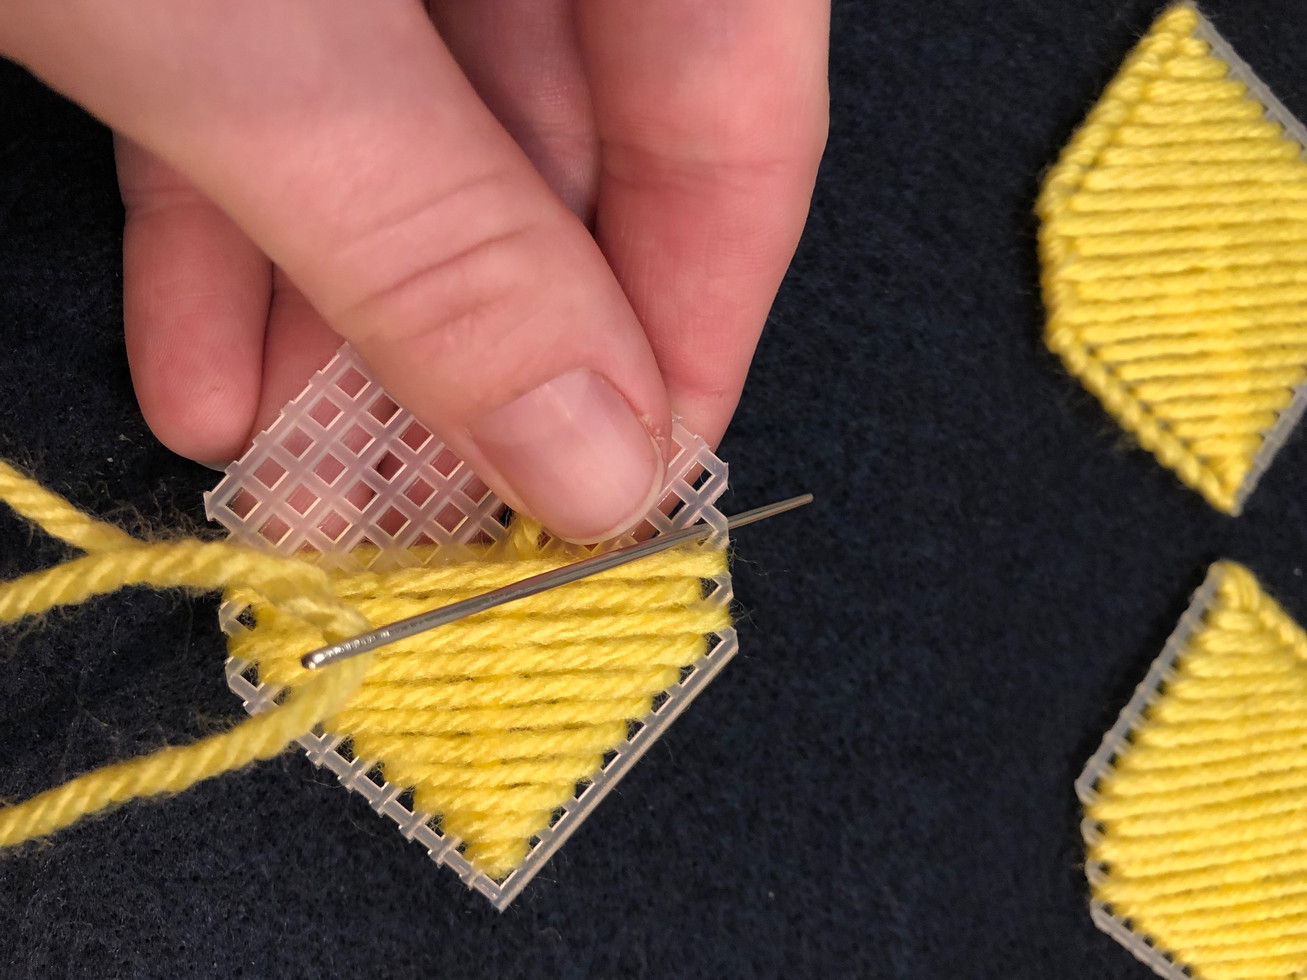


Next you need to select the color of yarn you're going to use. I'm going to use gray because I'm making an elephant today. First thread your needle it helps to squish the yarn between your thumb and finger and then slide the needle through your fingers to work the yarn through the eye.
Starting at the uncut corner pull the thread through the corner hole leaving a tail that you can grasp between your thumb and forefinger. Then, working down along the edges, pull the thread from edge to edge making a diagonal pattern across the square. Once you get to the cut edge we will change things up a little by pulling the yarn all the way down the opposite side around the open hole on the cut edge and back up to the next whole on the opposite cut edge. Repeat this till you cover all the diagonals between the cut corners. Once you get to the smooth edge you can go from edge to edge in the same diagonal pattern till you reach the end.
For two of the squares we will then wrap the edges to give a finished appearance with no plastic edge. Simply loop the yarn through each edge hole till you get to the cut corner. At the cut corners you will wrap through each hole twice to give good coverage. Once you get all the way to the opposite corner from where you started simply pull the yarn underneath the covering diagonal strands out through one of them toward the other side and cut it off to hide the end.
On the third Square you won't need to finish the edges, just pull the yarn up through underneath the diagonal threads, out and clip it off to hide the end. Now we are ready to assemble the squeezy cheek buddy.
Take two squares, one with a finished edge and one without a finished edge. Lay them together then take your needle with yarn and pull it through leaving a tail to hold onto to prevent the yarn from pulling through. Hold the tail along the edge and then Loop the needle through the two edges going from hole to hole to finish the two edges and sew them together. You will sew along the unfinished edges of the two pieces leaving the one piece with a finished edge unstitched. This finished edge will become one of the lips of your squeezy cheek buddy. Once you've sewn along all the unfinished edges of these two pieces open up the two pieces and insert the remaining piece, matching the unfinished edge with the unfinished edge of the piece already attached. Sew along these two unfinished edges till you get to the end of these two unfinished edges. Now pull the yarn underneath the existing yarn on the inside of the mouth and out toward the other side. Cut it off to hide the end of the yarn.
Now you have the basic shape of your squeezy cheek animal, a blank canvas as it where. Next comes the fun part, using your imagination to create any kind of animal you can think of (andmaybe some that no one has ever thought of). Today I’m going to create an elephant.
For this elephant I'm going to first select some eyeballs. You can buy these in packs of dozens or hundreds on Amazon, at Michael's or other craft stores. I'm also going to create a trunk by gluing together three little pom poms and gluing a little heart-shaped pink end to the trunk. I'll add a tongue by cutting out a little pink tongue-shaped piece of felt and gluing it on the inside of the mouth. I glue it toward the back so that it wobbles around a little bit like a real tongue.
For the ears I cut out round pieces of felt and smaller heart-shaped pieces of felt to represent the inside of the ear. You probably realize this isn't the shape of a real elephant ear but we're using artistic license here. I glue the hearts to the round gray circles then I pinch them together and glue them on to the top of our squeezy cheek buddy to represent the elephants here. Now I glue the trunk on and there you have it, an elephant.
Thanks for joining us today for this fun, easy project. One of the things I like to do is buy Hershey's Kisses and put them in the mouth. When I give them to people I tell them to squeeze his cheeks and he will give you a kiss.


Comments